Build a Raspberry Pi 4 Music Server
High End Performance for under $150.
Not a Kit. DIY Project to Share
How would you like to build a music server that rivals those that cost over 10 times as much for less than $150. This project (not a kit) will get you there. The performance is outstanding. It's so good, it allows digital sources to finally reach the sound quality it always was meant to have. The sound is much closer to vinyl, and that is with standard 44.1 kHz, 16 bit sources. Hi res digital should sound even better.
Here are the ingredients:
Raspberry Pi 4 computer, 4 gig $55
HiFiBerry DAC + Pro $40
Raspberry Pi 4 3A power supply $15
32 gig high speed (100MB/sec) micro SD $12
Pi fan $5
Misc Pi hardware $5
total $132 (plus shipping and taxes)
(also needed is a USB hard drive which most people already have)
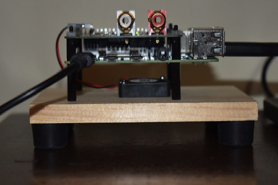
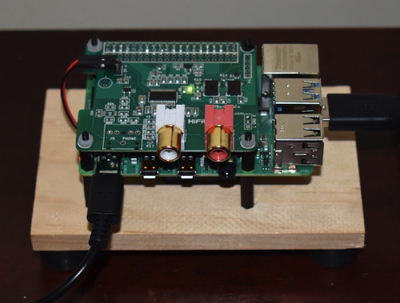
Here is how to build it. For the base, any type of material can be used. Shown is a scrap piece of 3/8 hardwood. A fan must be used. The assembly will get rather hot. The heat goes into the circuit board so the best place to mount the fan is underneath and have it blow upwards. This knocks the board temperature down about 35 degrees F.
The board should be about 20 mm or 3/4 inch above the base so air can freely flow around it. Pi hardware is 2.5 mm with .45 mm screw pitch.
Now for the operating system (OS) installation. First make sure the SD card is properly formatted, FAT32. (32 gig is the maximum size for the Pi) Best to use a dedicated formatter freeware program like
SD Card Formatter
Now download the operating system to your desktop computer. This project is using Volumio. It is also freeware but they have upgrades with subscription options. It is zipped so it must be unpacked first. For more detail about the OS, please refer to their website.
Volumio
Next, flash the Volumio to the mico SD card. This is not the same as copying a file. It requires another freeware program called balenaEtcher
balenaEtcher
Now flash the Volumio to the micro SD card.
Connect the hard drive and an ethernet cable to the Pi. Plug in the power supply. Give the OS about five minutes to cook.
This OS is headless. No keyboards or monitors are necessary. It uses any smart phone or tablet to control it. An internet browser is used for operation. This allows for complete remote control. The control device and the Pi must be on the same WiFi network. The OS generates a WiFi hotspot which is used to connect to your network. Once connected, the ethernet cable can be removed.
There are many configuration options. There are plug-ins for various streaming services and features. The OS can use a network hard drive if desired. The Pi USB ports cannot supply much current. They can power only one hard drive. There isn't enough current for a CD reader. A USB hub would then be necessary (untested for this build, nor has CD ripping been tested). New CD's can be ripped by plugging the hard drive into your desktop if desired.
That's the whole thing! It costs next to nothing and provides true high end performance. Please join us on the forum for relating your experiences with this project.